
To install a chimney pipe in a multi-story house, use connector (stove) pipe only in the room and transition to a UL 103HT listed Class A insulated chimney at the ceiling support box. The Class A chimney then passes through each floor, attic, and roof with 2-inch clearance to combustibles at every level.
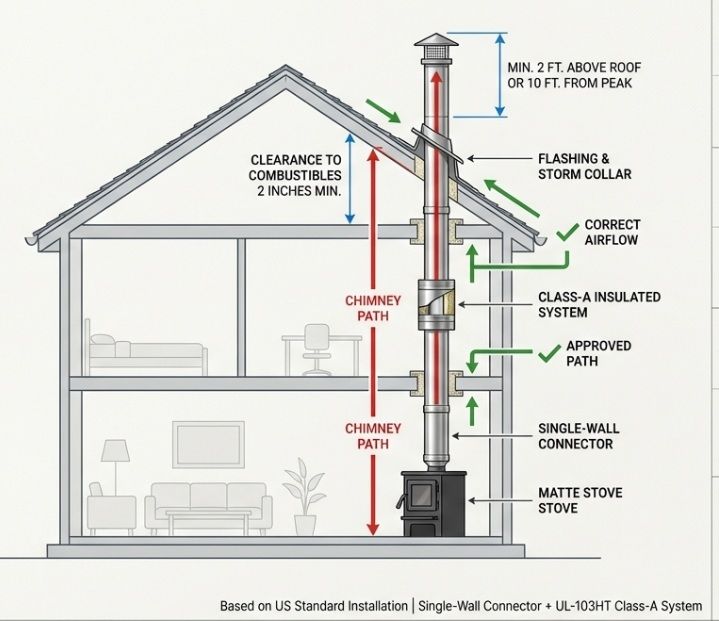
A wood stove looks simple: a warm firebox and a black pipe rising toward the ceiling. But chimney installation in a multi-story house is not a simple vent. What you see in the room is only the visible part of a listed safety system designed to handle extreme heat while passing through combustible structure. This guide covers five realities that DIY installers often learn too late. Always follow your stove manual, your chimney manufacturer installation instructions, and local building codes.
Quick navigation
- The black pipe is not the chimney
- Clearance is 18 inches vs 2 inches
- The best route is straight up
- The chimney is supported by the house
- The 3-2-10 rule decides chimney height
- Multi-story chimney installation checklist
- FAQ
1) The Black Pipe in Your Room Is Not the Chimney
A common mistake during chimney installation in a multi-story house is assuming that all venting is the same pipe. In reality, there are two distinct products with different functions:
- Connector (stove) pipe: The visible black pipe in the room (single-wall or double-wall) that connects the stove outlet to the transition point at the ceiling.
- Class A insulated chimney: A UL-listed chimney system (typically UL 103HT) designed for passage through ceilings, floors, attic spaces, and the roof while maintaining safe clearances.
In a two-story home, the chimney passes through multiple concealed structural cavities. Connector pipe is not listed for floor or ceiling penetration and should never run through walls, floors, or attic spaces. The chimney transition to Class A should occur at the proper listed ceiling support component.
2) Safety Clearance: 18 Inches vs 2 Inches
Clearance refers to the open air space required between a hot venting surface and any combustible material (framing, drywall, insulation, trim). The clearance requirement varies by component type. For chimney installation in a multi-story house, clearance must be respected at every level the chimney passes through - the first ceiling, the second ceiling, the attic, and up through the roof penetration.
| Component | Typical Clearance to Combustibles | Where Used |
|---|---|---|
| Single-wall connector (stove) pipe | 18 inches | Inside the room only |
| Double-wall connector (stove) pipe | 6 inches (verify listing) | Inside the room only |
| Class A insulated chimney (UL 103HT) | 2 inches | Through ceilings, floors, attic, and roof |
Keeping the flue gases warmer inside an insulated chimney often helps maintain draft and can reduce creosote buildup compared to a colder flue path. For more details on how clearances and support components work together, see our guide on in-house chimney support systems.
3) The Best Route Is Straight Up
The most straightforward and reliable layout for chimney installation in a multi-story house is a vertical centerline. Every offset adds parts and complexity and can negatively affect draft performance.
Offsets (angled sections) are permitted when installed per the manufacturer's instructions and within the listed limits, but they must be carefully planned. If your layout requires offsets, our elbow offset measurement guide explains how to calculate the correct angles and lengths. For many DIY installations, minimizing offsets is the safest approach.
4) The Chimney Is Supported by the House
Another common misconception is that the chimney stack sits on the stove. In most installations the stove supports only the connector pipe in the room. The heavier Class A chimney is supported by the structure of the house.
A typical two-story chimney system uses:
- Ceiling support box at the first ceiling penetration to carry the chimney weight.
- Firestop radiation shields at each floor and ceiling level to maintain clearance and fire safety.
- Attic insulation shields to protect insulation from contacting the chimney.
- Flashing and storm collar at the roof to create a weather-tight penetration.
- Roof brace kit when the chimney extends significantly above the roofline for stability.
The exact component list varies by manufacturer and layout. Proper planning ensures that each part serves its purpose in your multi-story chimney installation. For a full breakdown of which support component goes where, read our chimney support systems guide.
5) The 3-2-10 Rule Decides Chimney Height
Chimney termination height is governed by a widely accepted safety guideline in the USA known as the 3-2-10 rule (referenced in NFPA 211):
- The chimney must terminate at least 3 feet above the point where it exits the roof.
- The chimney must be at least 2 feet higher than any part of the building within 10 feet horizontally.
A common installation mistake is measuring from the roof ridge instead of from the actual penetration point. If the chimney is too short, draft problems and smoke spillage may occur. For a deeper explanation of how to measure chimney height correctly, see our article on required chimney height above the roof.
Multi-Story Chimney Installation Checklist
- Confirm the stove manual's required flue diameter and venting method.
- Use connector pipe only in the room, transition to listed Class A chimney at the ceiling support box.
- Maintain correct clearances at all levels of your multi-story installation.
- Plan the most vertical route possible; minimize offsets.
- Use the correct listed parts at each level (support, firestops, attic shields).
- Finish with proper flashing, storm collar, cap, and correct termination height per the 3-2-10 rule.
If your run passes through an attic, a complete through-the-attic kit includes the insulation shield you need where the pipe crosses the attic floor.
Not Sure Which Parts You Need?
Installing a chimney kit in a multi-story house is straightforward when you have the correct parts list matched to your layout. Pay attention to ceiling support length, firestop components, attic shields, roof pitch, and total chimney height above the roof.
Take advantage of our free chimney design service for a custom recommendation within 24 hours. You can also call us at 888-834-0880 (9 AM - 9 PM, 7 days a week) with your measurements (ceiling heights, attic height, roof pitch, and target chimney location).
FAQ: Chimney Installation in a Multi-Story House
Can I run black stovepipe through the second floor or attic?
No. Connector stovepipe is not listed for concealed-space penetration. When the venting passes through floors, ceilings, or attic spaces, only a UL-listed Class A chimney system and its required listed components should be used.
Do I need a ceiling support box on both floors?
Many chimney systems use a main support at the first ceiling penetration. Upper floor levels typically use firestop radiation shields to maintain clearance. Follow the chimney brand's installation instructions for your exact configuration.
What causes poor draft in a two-story chimney installation?
Common causes include insufficient chimney height (not meeting the 3-2-10 rule), too many offsets, cold exterior runs, or improper termination relative to roof structures. Minimizing offsets and keeping the chimney inside the building envelope usually improves draft.
Do I need roof bracing?
If the chimney extends more than about 5 feet above the roofline, a roof brace kit is typically required for stability. The exact requirement depends on the chimney system and local wind loads.
What is the difference between stove pipe and Class A chimney pipe?
Stove pipe (connector pipe) connects the stove to the ceiling transition and is used only inside the room. Class A chimney pipe is a fully insulated, UL 103HT listed system rated at 2100 degrees F, designed for safe passage through walls, ceilings, and roofs. They are not interchangeable.
Need More Information?
Hopefully, you just got all the answers you need, but maybe you still have a question. If you want to know about this or any other topic relating to domestic burners and flue pipes, then please check out our FAQ page.
Here are our installation guides.
If you have a more specific problem, or you need your purchase sorted out quickly, then take advantage of our years of experience and head to our contact page.






