
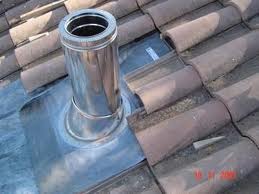
 Note on U.S. homes: Tiled roofs (clay or concrete tiles) are common in parts of the United States—especially the Southwest, Florida, and some coastal or Spanish-style neighborhoods. In many other regions, asphalt shingles are more typical. The instructions below focus on tile roofs; for shingle roofs, see our Through the Roof Kit.
The flashing itself is chosen by roof pitch rather than by roof covering, and the method is in our guide to picking a flashing by roof pitch.
1. Planning and Safety
- Consult a professional: If you are unsure about codes or roof work at height, consult a qualified installer or local inspector.
- Choose the route: Aim for the straightest vertical path with correct clearances to combustibles (per the chimney manufacturer).
- Check codes & permits: Local rules may require permits, spark arrestors, or specific roof flashing types for tile roofs.
2. Materials and Tools
Materials
- Insulated stainless-steel chimney pipe (UL103HT)
- Tile-compatible roof flashing (high-base or adjustable base for profiled tiles)
- Storm collar
- Chimney cap / rain cap (with spark arrestor where required)
- High-temperature roofing sealant and butyl/EPDM tape as specified by the flashing manufacturer
- Roof underlayment repair membrane
Tools
- Measuring tape, level, and marker
- Reciprocating saw or angle grinder (tile cuts)
- Hammer and pry bar (tile lifting)
- Drill/driver and stainless fasteners
- Caulking gun and roofing trowel
- Roof ladder, fall-arrest PPE
3. Mark the Chimney Path
- Inside the attic: Mark the centerline between rafters. Keep the required clearance hole size for the chimney support and firestop spacers.
- Through the roof deck: Drill a pilot hole at the center; from the roof, mark the full opening according to the support box and pipe OD + clearance.
4. Remove and Stage Roof Tiles
- Lift tiles carefully: Start above the opening and work upward to create space for the flashing. Do not force or crack tiles.
- Expose underlayment: Fold back or trim underlayment neatly; plan for repair laps later.
5. Cut the Roof Deck & Install Support
- Cut the deck opening to the template size. Maintain clearances to combustibles per the chimney manual.
- Install the support box or ceiling support (for cathedral ceilings) and firestop/spacer where required.
6. Assemble and Position the Chimney Pipe
- Assemble chimney sections from the appliance connection upward, locking joints as specified.
- Verify minimum height and termination above the roof line per code (2-10-3 rule or local equivalent) and per manufacturer’s instructions.
7. Fit the Tile Roof Flashing
Use a flashing designed for profiled tiles (high-base or adjustable). The goal is to shingle the flashing into the underlayment so water sheds properly.
- Dry fit: Slide the flashing base under the upslope tiles; the downslope edge sits on top of the lower tiles.
- Trim tiles as needed: Notch adjacent tiles to clear the pipe and flashing apron while maintaining tile overlap.
- Underlayment lapping: Lap new membrane over the top half of the flashing base and under the upper course of tiles.
- Seal & fasten: Fasten per manufacturer (typically at the sides and upslope). Seal transitions with approved high-temp sealant and butyl where specified.
8. Reinstall Tiles Around the Flashing
- Slide tiles back into place, preserving head-laps and side-laps.
- Replace any broken tiles; avoid point-loading on the flashing.
9. Install Storm Collar and Chimney Cap
- Place the storm collar around the pipe and over the flashing cone; seal the top edge with high-temp sealant.
- Install the chimney cap / rain cap as specified. Use a cap with spark arrestor where required.
10. Final Checks, Codes & Safety
- Draft & clearance check: Verify clearances at all penetrations; confirm proper support and plumb.
- Water test: Hose test gently upslope to confirm shedding. Re-seal if needed.
- Compliance: Confirm local code requirements and manufacturer’s instructions. Schedule inspection if applicable.
Need a Complete Kit?
For a faster, code-compliant install, see our Through the Roof Kit with UL103HT-certified components. Our team can help you size the system and select the correct tile flashing.
FAQ
Are tiled roofs common in the U.S.?
Yes, but usage varies by region. Tile roofs are more typical in the Southwest, Florida, and some coastal areas, while asphalt shingles are prevalent in many other states.
Do I need a special flashing for tiles?
Yes. Use a high-base or adjustable tile flashing compatible with your tile profile so the base can tuck under upslope tiles and shed water correctly.
Can I do this myself?
Experienced DIYers often can, but roof work at height is hazardous. If in doubt, consult a qualified installer.






