
Chimney liner cost splits two ways: a professional reline is quoted at roughly $1,500 to $3,800 installed, and our DIY stainless liner kits start at $559, with the exact figure set by the diameter and the chimney height you need. The stainless liner is the same 316Ti a professional fits, so the gap between the two numbers is labor, access and inspection rather than materials.
Below you will find what your own chimney should cost, what makes a quote high or low, and how to tell whether the number you have been given is fair. If you would rather skip to a real figure for your chimney, we will price your exact kit free: call 888-834-0880 or use our free flue-design service.
This page covers relining an existing chimney. If you are replacing metal pipe rather than lining masonry, see chimney pipe replacement cost. If you are costing a complete new system, see chimney installation cost.
| What drives the price | Why it changes the cost |
|---|---|
| Diameter (4, 5, 5.5 or 6 inch) | A wider flue uses more stainless material |
| Length, which is your chimney height | Lengths run from 15 to 40 feet, priced per foot |
| Insulation | An insulation wrap adds material and effort, and is often needed on an exposed chimney |
| Connection parts | Top plate, rain cap, and either a tee or an appliance connector |
| DIY or professional | DIY saves the labor cost. Your Limited Lifetime Warranty is unaffected either way, as long as the liner is installed to the instructions supplied with it |
What a DIY Chimney Liner Kit Costs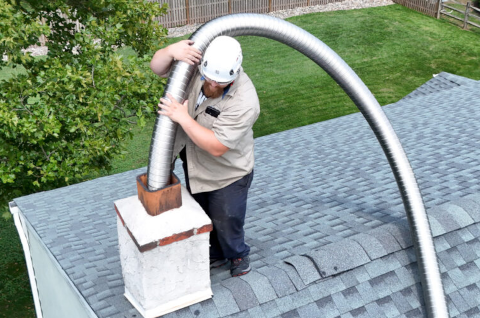
Liner kits start at $559, and that entry price already includes the flexible 316Ti stainless liner, the top plate, the rain cap and an appliance connector, with free shipping. There are 29 configurations because the price follows your diameter and your chimney height rather than a single sticker. The five most common are below.
| Kit, inches by feet | Price | Typical use |
|---|---|---|
| 4 x 20 ft, appliance connector | $559 | Smaller appliance, short single-story flue |
| 5 x 20 ft, tee connector | $619 | Side entry into the chimney |
| 5.5 x 20 ft, tee connector | $639 | The in-between size, between 5 and 6 inch |
| 6 x 20 ft, appliance connector | $639 | The common wood stove reline |
| 6 x 30 ft, appliance connector | $859 | Two-story or taller chimney |
Your liner range is 4, 5, 5.5 and 6 inch, in lengths from 15 to 40 feet. Every liner is 316Ti stainless, rated for 1000 degrees F continuous use, and carries a Limited Lifetime Warranty. Returns are 14 days, no questions asked.
Professional Chimney Liner Installation Cost
Professional chimney relining costs $1,500 to $3,800 on average. Complex jobs -- tall chimneys, difficult access, cast-in-place liners, or chimneys that need repair before lining -- can reach $7,000 or more.
| Service | Cost Range |
|---|---|
| Stainless steel flexible liner (installed) | $1,500 - $3,800 |
| Clay tile liner (installed) | $2,000 - $3,500 |
| Cast-in-place liner (installed) | $2,000 - $7,000 |
| Chimney inspection (Level 2, with camera) | $150 - $500 |
| Old liner removal (if needed) | $500 - $1,500 |
Labor typically accounts for 40% to 60% of the professional price. The materials are the same ones available in DIY kits -- the difference is the labor, the inspection, and the warranty on the workmanship.
Is Your Chimney Liner Quote Fair?
Start from the materials, because that is the half you can check exactly. A 6 x 20 ft kit is $639, so on a straight reline everything above that figure in a quote is labor, access and extras. Ask your installer to separate the two, then use the five points below to judge whether the labor half is doing real work.
| What pushes a quote up | What to ask |
|---|---|
| Chimney height | A 35 foot run needs more liner and more time than a 20 foot run. Ask which length they have quoted |
| Roof access | A steep or high roof may need scaffold or a lift, hired by the day. Ask whether access equipment is in the price |
| Breaking out the old flue | Removing clay tile needs specialist equipment and is the single biggest legitimate addition. Ask whether your chimney needs it at all |
| Insulation | An exposed or exterior chimney usually needs a wrap or a pour. Ask whether it is included or extra |
| Repairs before lining | Crumbling mortar or a damaged crown has to be fixed first. Ask for this to be itemised separately from the lining |
Three questions that tell you most. What diameter and length are you quoting, and why that diameter? Does the price include a camera inspection? Is the old liner coming out, and if so what does that cost on its own? A quote that cannot answer those three is not a quote you can compare.
If you want a second opinion on the materials half of a quote you have been given, send us the diameter and the height and we will price the equivalent kit free: 888-834-0880.
DIY Kit vs Professional: The Real Difference
For a typical 6" x 20-foot chimney with a straight run and no major damage, the cost comparison looks like this:
| DIY Kit | Professional | |
|---|---|---|
| Materials | $639 for the 6 x 20 ft kit | $639 for the 6 x 20 ft kit |
| Labor | Your time (4-8 hours) | $800 - $2,000 |
| Inspection | Optional ($150 - $500) | Usually included |
| Product warranty | Limited Lifetime Warranty (on materials) | Limited Lifetime Warranty (materials + labor) |
| Total | $500 - $1,200 | $1,500 - $3,800 |
The savings from a DIY kit are typically $1,000 to $3,000. That makes chimney relining one of the higher-value DIY projects for homeowners who are comfortable working on a roof and following instructions carefully.
When Does DIY Make Sense?
A DIY chimney liner kit is a good fit when:
- Your chimney has a straight, unobstructed run from top to bottom
- The masonry is in sound condition (no crumbling mortar, no structural damage)
- You are relining a chimney that already has a flue opening at the top and a connection point at the bottom
- You are comfortable working on a roof safely
Hire a professional when:
- Your chimney has offsets, bends, or damage that needs repair first
- You need the old clay tile liner removed (this requires specialized equipment)
- Local building codes require a professional installation or a permit
- You are connecting to a fireplace insert (these often have tighter clearances)
If you are unsure, a chimney inspection ($150 to $500) before you buy anything will tell you whether your chimney is a candidate for a DIY kit or needs professional work.
Ready to configure a kit? Build your chimney liner kit in 2 minutes, or ask our team to verify your sizing for free.
What Drives the Cost of a Chimney Liner Kit?
Diameter
Liner diameter is determined by your stove or appliance. Most wood stoves use a 6-inch liner. Our range runs from 4 to 6 inch. The larger the diameter, the higher the material cost -- a 6-inch liner costs roughly 20% to 30% more than a 5-inch of the same length.
Length
Measure from the top of your chimney to the stove connection point. Most residential chimneys are 15 to 25 feet. Add a few extra feet for the top plate connection and any bends. Kits are typically available in standard lengths (15, 20, 25, 30 feet), with custom lengths available on request.
Material Grade
Stainless steel chimney liners come in several grades:
| Grade | Suitable For | Typical Cost Impact |
|---|---|---|
| 304 stainless steel | Gas, oil, wood (with insulation per UL 1777) | Base price |
| 316L stainless steel | All fuels including wood and coal | 10% - 15% more than 304 |
| 316Ti stainless steel | All fuels including wood and coal | 15% - 25% more than 304 |
| Aluminum | Gas only (not for wood or oil) | 50% - 70% less than stainless |
For wood burning applications we supply 316Ti, which is rated for all fuels including wood. Our liner kits carry a Limited Lifetime Warranty. Aluminum is only suitable for gas appliances and has a shorter lifespan (5 to 15 years). Grade is only half the decision; our guide to the three types of chimney liner covers the shape of the liner itself.
Insulation
Insulation is not always required, but it improves performance and is sometimes mandatory by code. Wood-burning appliances in particular benefit from an insulated liner because it keeps flue gases hotter, which reduces creosote buildup and improves draft.
Insulation adds $100 to $250 to a kit. The two common types are ceramic blanket wrap (wrapped around the liner before installation) and vermiculite pour (poured into the gap between the liner and the chimney wall after installation). For more detail, see our guide on insulated vs non-insulated chimney liners.
Connection Type
Your kit needs a connection at the bottom where the liner meets the stove or appliance. There are two main types:
- Appliance connector (vertical): used when the stove pipe enters the chimney straight up from the top of the stove. Simpler and less expensive.
- Tee connector (horizontal): used when the stove pipe enters the chimney from the side, through a thimble in the wall. The tee adds $50 to $120 to the kit cost.
Not sure which you need? See our guide on connecting a chimney liner to a stove pipe.
What Is Included in a Chimney Liner Kit?
A complete stainless steel chimney liner kit should include everything you need to reline from top to bottom:
| Component | Function |
|---|---|
| Flexible chimney liner | The main tube that runs the full length of the chimney |
| Top plate | Seals the top of the chimney around the liner |
| Rain cap | Keeps rain, animals, and debris out of the flue |
| Appliance connector or tee | Connects the liner to the stove pipe at the bottom |
Some kits also include a storm collar (seals the gap between the top plate and the liner against weather) and clamps. Insulation and pulling cones are usually optional add-ons.
Watch out for "kits" that are actually just the liner without components. If a price looks too low, check whether the top plate, cap, and connector are included or sold separately. Buying components individually almost always costs more than a pre-configured kit.
How to Save Money on Chimney Relining
- Use a configurator. A kit configurator lets you select exactly the diameter, length, connection type, and add-ons you need -- no over-ordering, no missing parts. Configure a chimney liner kit here.
- Get a free flue design check. Choosing the wrong diameter or length wastes money on returns and re-orders. A free flue design service confirms your measurements before you order.
- Skip insulation only if your situation allows it. Gas appliances in a sound masonry chimney often do not require insulation. Wood-burning appliances almost always benefit from it. Our guide on chimney liner insulation covers when it is required and when it is optional.
- Buy the kit, not the parts. A complete kit with top plate, cap, and connector is almost always cheaper than buying each component separately.
- Do not cheap out on material grade. Aluminum liners cost less upfront but only last 5 to 15 years and are limited to gas. A stainless steel liner with a Limited Lifetime Warranty is the better long-term value.
Cost by Chimney Height
Most of the cost of a chimney liner kit is in the liner itself, which is priced per foot. Here is a rough guide to total kit cost by chimney height for a 6-inch stainless steel kit with appliance connector:
| Chimney Height | Estimated Kit Cost (6", no insulation) |
|---|---|
| 15 feet | $400 - $550 |
| 20 feet | $639 for the 6 x 20 ft kit |
| 25 feet | $600 - $850 |
| 30 feet | $700 - $1,000 |
Add $100 to $250 for insulation, $50 to $120 if you need a tee connector instead of an appliance connector, and $20 to $40 for a pulling cone.
Because the price follows your chimney, the surest estimate is a designed one. Send us your chimney height and appliance and get free flue-design help: we size the liner and list every part so you see the full cost before you buy. Or call a specialist at 888-834-0880. When you are ready, the matched chimney liner kits come as one system with a Limited Lifetime Warranty.
Can You Put a Liner in an Old Chimney?
Yes, and an old chimney is the most common reason to line one. A flexible stainless liner is designed to be fed down a chimney that already exists, including one with a clay tile flue that has cracked, and including chimneys well over a century old. What matters is not the age but whether the structure is sound: the masonry has to hold together, and the run has to be clear enough to pass a liner down. If the mortar is crumbling or the crown is broken, that gets repaired first, then lined.
A camera inspection is the way to know. It costs less than the reline and it is the difference between a job you can do yourself and one you should not.
What Is the Lowest-Cost Way to Line a Chimney?
Fitting a stainless liner kit yourself, on a chimney that does not need the old flue broken out. Kits start at $559 against roughly $1,500 to $3,800 for the same work done for you, and it is the only route that removes the labor cost rather than trimming it. It asks for one day, a helper, and comfort working on a roof.
Two things we would not do to save money. Fitting an aluminum liner to a wood stove, because aluminum is not rated for solid fuel. And skipping the insulation on an exterior chimney, because a cold liner draws badly and gathers creosote faster. Your warranty is unaffected by doing the work yourself, as long as you follow the instructions supplied with the kit.
Are Chimney Liners Worth It?
For an unlined or a damaged chimney, yes, and it is usually not optional. A liner gives the flue gas a continuous, correctly sized path to the outside, which is what stops it leaking through cracked masonry into the house and what keeps the chimney drawing properly. On a wood stove specifically, a liner sized to the appliance outlet rather than to the old masonry flue is what stops the gas cooling and dropping creosote, which is the fuel in a chimney fire.
The 316Ti stainless in these kits is rated for 1000 degrees F continuous use and carries a Limited Lifetime Warranty, so on a chimney you intend to keep it is a one-time job rather than a recurring cost. A stainless liner in a sound chimney is normally the last one that chimney needs.
What Are the Signs You Need a New Chimney Liner?
Five signs, and any one of them is a reason to get a camera inspection before the next burning season. Pieces of clay tile in the firebox or the cleanout, which means the existing flue is breaking up. A smell of smoke in rooms next to the chimney, which means gas is escaping the flue. Staining or damp on the chimney breast. Creosote building up faster than one season. And a stove outlet smaller than the flue it vents into, which is the commonest reason an older masonry chimney draws badly.
A Level 2 inspection with a camera is what confirms it, and it is the step that also tells you whether your chimney takes a kit or needs professional work first.
What Codes and Permits Apply to a Chimney Liner?
Two things decide whether a liner is the right one, and a third is local. The liner needs to be listed for the fuel you are burning, which for a wood stove means a stainless liner rated for solid fuel rather than an aluminum one rated for gas. It has to be sized to the appliance outlet rather than to the old masonry flue, because an oversized liner is the classic cause of a cold, creosote-forming draw. Whether the job needs a permit or an inspection sign-off is set by your own jurisdiction and varies by county, so it is worth one call to your building department before you start.
We do not publish a code citation for liner sizing here because the applicable figure comes from your appliance manufacturer's listed outlet size, not from a single national number. Send us the make and model with your chimney height and we will size it with you: 888-834-0880.
Frequently Asked Questions
How long does a chimney liner last?
A stainless steel chimney liner (316Ti) typically lasts 15 to 20 years or more with proper maintenance. Our liner kits carry a Limited Lifetime Warranty. Aluminum liners last 5 to 15 years. Clay tile liners can last 50 years but are prone to cracking under high heat.
Do I need a chimney liner?
If you burn wood, coal, or oil, building codes in most US states require a chimney liner. Even for gas appliances, a liner improves safety and efficiency. If your existing liner is cracked, deteriorated, or missing, relining is a safety necessity, not an upgrade. See our detailed guide on why a chimney liner is required.
Can I install a chimney liner myself?
Yes, if your chimney has a straight run, is in sound structural condition, and you are comfortable working on a roof. A flexible stainless steel liner kit is designed for homeowner installation -- it does not require specialized tools beyond a screwdriver, a drill, and basic hand tools. For step-by-step guidance, see our chimney liner installation instructions.
How do I know what size liner I need?
Match the liner diameter to the flue collar on your stove or appliance. Most wood stoves use 6-inch. Our range runs from 4 to 6 inch. Never install a liner smaller than the appliance requires. For length, measure from the top of your chimney to the connection point and add a few feet. If you are unsure, our team offers a free flue design service to help you get the right size.
Do I need to insulate my chimney liner?
It depends on your fuel type and chimney construction. Wood-burning appliances benefit significantly from insulation because it keeps flue gases hotter, reduces creosote, and improves draft. Gas appliances in a sound masonry chimney may not require it. Check your local codes and see our comparison of insulated vs non-insulated liners.
Ready to Order Your Chimney Liner Kit?
Our 316Ti stainless steel liner kits include everything you need -- liner, top plate, rain cap, and connector. Select your diameter and length, and the price updates instantly. Free shipping on every order.
Not sure which size you need? Our team offers a free flue design service -- tell us your stove model and chimney measurements, and we will recommend the right kit.
Need More Information?






