
I installed a Class A insulated chimney pipe straight through my cabin's metal roof
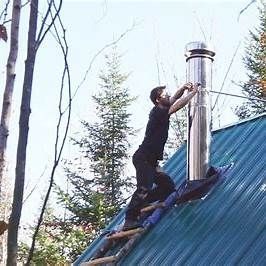 Kit used:
using a stainless steel roof exit kit. The full install took one afternoon, required basic tools, and followed NFPA 211 clearance rules. Below is exactly how I did it - step by step - so you can do it too.
Location: Northern Minnesota, USA Twin Wall Straight-Up Roof Exit Kit - Stainless Steel
Building type: Off-grid cabin with pitched metal roof
Stove: Compact wood stove for heating and cooking
Why I Chose a Roof Exit System
My cabin is off-grid and gets pretty cold in winter. I needed a reliable wood stove setup and a safe way to vent it through the roof. Because there wasn't much wall space, I decided to go straight up with a stainless steel roof exit kit from flue-pipes.com. The kit looked solid and came with all the parts I needed.
A straight-up roof exit is often the best choice for small cabins. The vertical chimney path creates strong natural draft, and you avoid the complexity of routing pipe through a wall and up the outside of the building. Per NFPA 211, Class A chimney pipe must maintain a minimum 2-inch clearance to all combustible materials - something that's easier to control with a straight vertical run through one ceiling and one roof.
What I Needed
Here's what came in the kit, plus the extra items I used:
- Class A insulated chimney pipe sections (UL 103 HT listed, rated to 2100 degrees F)
- Ceiling support box (carries the weight of the chimney stack above)
- Stainless steel roof flashing (adjustable for roof pitch)
- Storm collar
- Rain cap
- Connecting stove pipe (single wall black pipe, from stove to ceiling support box)
- High-temp silicone sealant
- Hole saw, jigsaw, drill, tape measure, plumb bob
- Roof safety harness and ladder
Step-by-Step Installation
Step 1 - Measure the Chimney Path
I marked the center of the stove collar, then measured straight up to find the roof penetration point. I used a plumb bob to make sure the ceiling and roof holes would line up perfectly. I also checked that no roof rafters were in the way - you need at least 2 inches of clearance on all sides of the pipe per NFPA 211.
Step 2 - Cut the Ceiling and Roof Openings
I used a hole saw for the ceiling panel and a jigsaw for the metal roof. I framed the opening to maintain the required 2-inch clearance around the pipe. This is critical - local building codes and UL 103 HT require this clearance to combustibles at every penetration point.
Step 3 - Install the Support Box
The ceiling support box was easy to mount and helped align the pipe. It also carries the full weight of the chimney pipe above, so it needs to be securely fastened to the framing. I used lag screws into the ceiling joists.
Step 4 - Install Flashing and Chimney Pipe
On the roof, I slid the stainless steel flashing under the metal panels on the uphill side and over the panels on the downhill side. I sealed it with high-temp silicone. Then I dropped in the twin wall pipe from above, locking each section together. The pipe sections snap together with a twist-lock connection - simple and solid.
Step 5 - Add Storm Collar and Rain Cap
I finished the top with a storm collar (sealed with silicone) and a rain cap. The chimney must extend at least 3 feet above the point where it exits the roof and at least 2 feet higher than any part of the building within 10 feet - that's the 3-2-10 rule. My cabin is small, so meeting this height requirement was straightforward.
Component Specifications
| Component | Specification | Why It Matters |
|---|---|---|
| Class A chimney pipe | UL 103 HT listed, 2100 degrees F rated, 2-inch clearance to combustibles | Only pipe type allowed through ceilings and roofs per NFPA 211 |
| Connecting stove pipe | Single wall: 18-inch clearance / Double wall: 6-inch clearance | Used only inside the room - never through walls, ceilings, or roofs |
| Ceiling support box | Maintains 2-inch clearance, carries chimney weight | Required at every ceiling penetration |
| Roof flashing | Stainless steel, adjustable for roof pitch | Prevents water leaks around the pipe |
| Storm collar + rain cap | Stainless steel | Weather protection and spark arrest |
Performance and Appearance
The stove now draws beautifully, even in cold weather. I've had no backdraft or smoke leaks. The stainless steel pipe looks great against the metal roof and feels very sturdy. It gives me peace of mind knowing it's a Class A chimney system that is UL 103 HT listed and rated to withstand 2100 degrees F.
If you're planning a similar cabin chimney project, I'd also recommend reading about how to route chimney pipe through an attic - many cabins with loft spaces face similar challenges. And if you're not sure which pipe diameter or kit configuration you need, the free chimney design service can sort that out for you.
My Takeaways
If you're doing this alone, take your time. Pre-measure everything, and if your roof is steep or metal, have the right safety gear. I managed the whole install in one afternoon, and I'd do it again the same way.
A few things I'd tell anyone considering a cabin chimney install:
- Always use Class A chimney pipe for roof penetrations - never stove pipe. They are not interchangeable.
- Check your local building codes before you start. Most jurisdictions follow NFPA 211, but some have additional requirements.
- The 3-2-10 rule determines your minimum chimney height - don't guess this.
- If you're on a metal roof, use a proper adjustable flashing designed for your roof pitch. Generic flashing will leak.
- Have someone on the ground when you're working on the roof, especially on steep pitches.
More Real Installations
- Chimney Pipe Kit Installation in My Backyard Shed
- Through-the-Wall Chimney System in My Garage
- Installing a Chimney Pipe Through Two Floors
Ready to Install a Chimney in Your Cabin?
Not sure which roof exit kit or pipe diameter is right for your cabin? Use our free chimney design service for a custom recommendation within 24 hours. Or call us at 888-834-0880 (9 AM - 9 PM, 7 days a week). You can also browse our complete range of chimney kits and Class A chimney pipe to find exactly what you need.
Frequently Asked Questions
Can I use stove pipe to go through a cabin roof?
No. Stove pipe (single wall or double wall black pipe) is only rated for use inside the room where the stove is installed. To pass through a ceiling or roof, you must use Class A insulated chimney pipe that is UL 103 HT listed. This is required by NFPA 211 and virtually all local building codes.
What clearance does Class A chimney pipe need from combustible materials?
Class A chimney pipe requires a minimum 2-inch clearance to all combustible materials, including framing, insulation, and roofing materials. This clearance must be maintained at every point where the pipe passes through a ceiling, floor, or roof. A ceiling support box and firestop are designed to maintain this gap automatically.
How tall does a cabin chimney need to be above the roof?
Your chimney must follow the 3-2-10 rule: it must extend at least 3 feet above the point where it exits the roof and at least 2 feet higher than any part of the building within a 10-foot horizontal distance. This ensures proper draft and prevents downdrafts caused by wind hitting the roofline.
Do I need a permit to install a chimney pipe in a cabin?
In most jurisdictions, yes. Even off-grid cabins typically fall under local building codes that require a permit and inspection for chimney installations. Check with your local building department before starting. Some rural counties are more relaxed, but using UL 103 HT listed components and following NFPA 211 keeps you safe regardless.
Need More Information?
Hopefully, you just got all the answers you need, but maybe you still have a question. If you want to know about this or any other topic relating to domestic burners and flue pipes, then please check out our FAQ page.
Here are our installation guides.
If you have a more specific problem, or you need your purchase sorted out quickly, then take advantage of our years of experience and head to our contact page.






