
How It Works: Class A Chimney Pipe Replaces a Masonry Chimney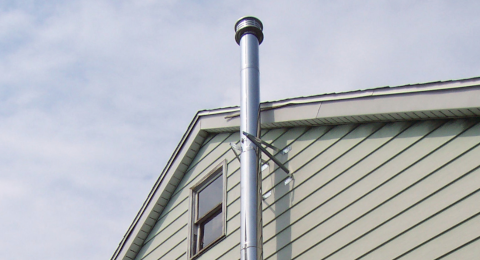
A Class A insulated chimney pipe is a factory-built chimney system that does everything a masonry chimney does, but without the bricks, mortar, and construction cost. It consists of double-wall or triple-wall stainless steel pipe with insulation between the layers. The insulation keeps the outer wall cool enough to install with just 2 inches of clearance to combustible materials like wood framing and drywall.
Class A pipe is UL 103 HT listed, meaning it has been tested to withstand continuous flue gas temperatures and has survived chimney fire testing at 2,100 degrees F. It is the only type of pipe that is approved to pass through ceilings, floors, walls, and roofs. Regular stove pipe (the black single-wall or double-wall connector pipe) can never be used for this purpose.
Two Ways to Install: Internal vs. External
When your house has no chimney, you have two routes to get the pipe from your stove to above the roofline. Each has trade-offs:
| Internal (through the ceiling and roof) | External (through the wall and up the outside) | |
|---|---|---|
| Route | Stove pipe connects to Class A at a ceiling support box, pipe runs through attic and exits through roof | Stove pipe connects to Class A at a wall thimble, pipe exits through wall, turns 90 degrees upward, and runs up the exterior wall |
| Draft performance | Better - pipe stays warm inside the heated building | Weaker - pipe is exposed to cold outdoor temperatures |
| Creosote risk | Lower - warmer pipe means less condensation | Higher - cold exterior pipe cools gases faster |
| Appearance | Clean exterior look, pipe hidden inside the house (can be boxed in upstairs) | Visible metal pipe on the outside of the building |
| Installation complexity | Requires cutting through ceiling, attic floor, and roof | Requires cutting through one exterior wall |
| Cost | Slightly higher (more components: ceiling support box, firestops, attic shield, roof flashing) | Slightly lower (fewer structural penetrations) |
| Best for | Primary heating systems, cold climates, best long-term performance | Situations where roof penetration is not possible or not wanted |
For most homes, the internal route is the better choice. Running the chimney inside the house keeps the pipe warmer, produces stronger draft, reduces creosote buildup, and looks cleaner from the outside. The external route is a good alternative when roof access is difficult, the attic layout makes a straight vertical run impossible, or you prefer not to cut through upper floors.
We have step-by-step guides for both approaches:
- How to install a chimney pipe through the house (internal route)
- How to install an external Class A chimney pipe (external route)
What Components Do You Need?
A complete no-chimney installation requires stove pipe inside the room and Class A chimney pipe from the transition point to above the roof. Here is the full parts list for each route:
Internal route (through ceiling and roof)
- Stove pipe - single-wall or double-wall black pipe from the stove's flue collar to the ceiling
- Ceiling support box - supports the transition from stove pipe to Class A and provides the required clearance at the ceiling penetration
- Firestop / radiation shield - installed at every floor or ceiling the pipe passes through
- Attic insulation shield - keeps loose insulation away from the pipe in the attic
- Class A chimney pipe sections - insulated pipe that runs from the ceiling support box through the attic and out the roof
- Roof flashing - seals the roof penetration around the pipe, matched to your roof pitch
- Storm collar - fits around the pipe above the flashing to prevent water from running down the pipe into the flashing
- Chimney cap - covers the top of the pipe to keep out rain, animals, and debris
- Roof brace kit - required if the pipe extends more than 5 feet above the roof surface
External route (through wall and up outside)
- Stove pipe - single-wall or double-wall black pipe from the stove to the wall
- Wall thimble - insulated pass-through that allows the Class A pipe to safely penetrate the combustible wall
- Tee fitting - a T-shaped pipe section mounted on the outside wall that connects the horizontal wall penetration to the vertical run going up
- Tee cap - covers the bottom of the tee for inspection and cleaning access
- Wall support bracket - supports the weight of the vertical pipe run from the outside wall
- Class A chimney pipe sections - vertical run up the exterior wall
- Wall bands / brackets - secure the pipe to the wall every 4-8 feet depending on manufacturer specs
- Chimney cap - same as internal route
- Roof brace kit - if the pipe extends past the roofline by more than 5 feet
Our complete chimney kits include all of these components in one package, sized for your specific installation. This saves you from sourcing individual parts and makes sure everything is compatible.
How Much Does It Cost to Install a Wood Stove Without a Chimney?
The chimney pipe system is usually the biggest cost when there is no existing chimney to work with. Here is a rough breakdown:
| Component | DIY cost estimate |
|---|---|
| Wood stove (EPA certified) | $800-$3,000 |
| Stove pipe (single or double wall, room section) | $50-$200 |
| Class A chimney pipe kit (all components for internal or external) | $800-$2,000 |
| Hearth pad (non-combustible floor protection) | $100-$400 |
| Wall heat shield (if needed for clearance) | $100-$300 |
| Total DIY materials | $1,850-$5,900 |
| Professional installation (labor only) | $1,000-$3,000 |
| Total with professional install | $2,850-$8,900 |
Compare that to building a masonry chimney from scratch, which typically costs $10,000 to $30,000+. A Class A chimney pipe system gives you the same safe, code-compliant venting at a fraction of the cost, and most DIY homeowners can complete the installation in a weekend.
Key Rules for No-Chimney Installations
Whether you go internal or external, these rules apply to every installation:
- Stove pipe stays in the room only - never run black stove pipe through a wall, ceiling, or floor. It is not rated for structural penetrations and is a fire hazard
- Class A pipe for all structural penetrations - only UL 103 HT-listed Class A insulated chimney pipe can pass through walls, ceilings, attics, and roofs
- 2-inch clearance to combustibles - maintain at least 2 inches between the Class A pipe outer wall and any combustible material (wood framing, drywall, insulation)
- Firestops at every penetration - every floor, ceiling, or wall the pipe passes through must have a firestop or radiation shield installed
- Meet the 3-2-10 rule - the chimney must extend at least 3 feet above the roof and 2 feet above any structure within 10 feet. See our chimney height guide for calculation details
- Minimum 15 feet total height - most stove manufacturers require at least 15 feet of total chimney height from the stove's flue collar to the top of the cap
- Do not share flues - the wood stove must have its own dedicated chimney. Never connect it to an existing furnace flue, water heater vent, or another appliance
For a full overview of all applicable codes, read our guide on building and safety codes for chimney pipe installation.
Special Cases
Two-story homes
Installing in a two-story home without a chimney is absolutely possible. With the internal route, the Class A pipe runs from the first floor through the second floor and out the roof. The pipe can be boxed in on the second floor to look like a built-in column and to keep it from being touched. Our multi-story chimney installation guide covers this scenario in detail, including how to handle firestops between floors.
Mobile homes and manufactured housing
Mobile homes have additional requirements. Most states and manufacturers require HUD-approved wood stoves, double-wall stove pipe, outside combustion air, and specific tie-down systems. See our dedicated guide on installing a wood stove in a mobile home before starting.
Single-story with cathedral ceiling (no attic)
If you have a cathedral ceiling with no attic space, the Class A pipe runs from a ceiling support directly through the roof in one continuous vertical run. This is one of the simplest installations possible. Our cathedral ceiling installation guide walks through the process.
Cabins, sheds, and small outbuildings
Smaller structures are straightforward because the pipe runs are short. A straight vertical run through the roof is usually the best option. For a real-world example, see our article on installing a Class A chimney in a shed.
Do You Need a Permit?
In most U.S. jurisdictions, yes. Installing a wood stove and chimney system typically requires a building permit and an inspection by the local Authority Having Jurisdiction (AHJ). The permit process confirms your installation meets NFPA 211, local building codes, and the stove and chimney pipe manufacturer's instructions.
Skipping the permit can create problems with your homeowner's insurance (they may deny claims for fire damage) and when selling the home (the unpermitted installation may be flagged during the buyer's inspection). The permit fee is typically $50 to $200 - a small cost compared to the risk of an uninsured loss.
Get Started With a Free Chimney Design
Every house is different, and the best installation route depends on your floor plan, ceiling height, roof pitch, and stove location. Our team will review your situation and recommend the right components for your setup - free of charge.
Use our free chimney design service to get a custom recommendation within 24 hours. Send us your room dimensions, stove model, and a photo of the planned stove location. Or call us at 888-834-0880 (9 AM - 9 PM, 7 days a week).
You can also browse our installation guides and video library for step-by-step walkthroughs of every installation type.
Frequently Asked Questions
Can I vent a wood stove through a wall without going up through the roof?
You can exit through a wall, but the pipe must still go up. After passing through the wall, the Class A pipe turns 90 degrees upward using a tee fitting and runs vertically up the outside of the building. It must rise above the roofline and meet the 3-2-10 height rule. You cannot simply vent horizontally through a wall and stop there.
Is a Class A chimney pipe as safe as a masonry chimney?
Yes. Class A pipe is UL 103 HT listed and tested to survive chimney fire temperatures of 2,100 degrees F. It requires only 2 inches of clearance to combustibles, compared to 2 inches for masonry. Both systems are equally safe when installed correctly and maintained properly.
Can I install a wood stove in a new-build home?
Absolutely. Most new homes are built without masonry chimneys, making Class A chimney pipe the standard solution. Work with your builder to plan the pipe route during construction, when it is easiest to install ceiling supports, firestops, and roof penetrations before the drywall goes up.
How long does a Class A chimney pipe installation take?
For a straightforward single-story through-the-roof installation, most DIY homeowners finish in one day (6-10 hours). A two-story installation or external wall route may take a full weekend. Professional installers typically complete the job in 4-8 hours.
Do I need a hearth pad under my wood stove?
Yes. Your stove must sit on a non-combustible hearth pad that extends beyond the stove on all sides per the manufacturer's specifications. The pad protects the floor from heat and stray embers. Pre-made hearth pads are available in various sizes and finishes, or you can build one from cement board, tile, or stone.
Need More Information?
Hopefully, you just got all the answers you need, but maybe you still have a question. If you want to know about this or any other topic relating to domestic burners and flue pipes, then please check out our FAQ page.
Here are our installation guides.
If you have a more specific problem, or you need your purchase sorted out quickly, then take advantage of our years of experience and head to our contact page.






