Installing twin wall flue through the house
SELECT YOUR TWIN WALL FLUE KIT

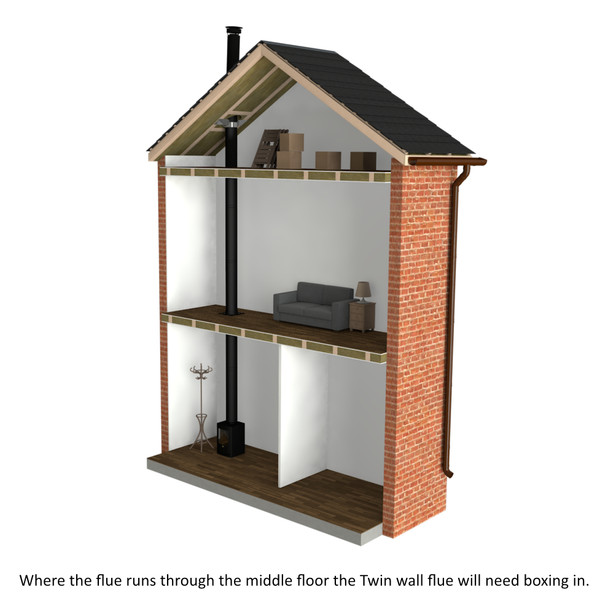
Boxing - in of a flue
If the flue passes through bedrooms, it should be “boxed in” with an inspection hatch situated in a specific place. In the loft, it will likely need some type of mesh protection. This is valid for every floor, except for the floor when the stove in.
A bedroom or a storage space is a great example where toys or curtains may easily get too close to the flue/chimney. In this situation, guarding is more commonly done by boxing the flue in, although some type of mesh is still a way to do it. in normal conditions curtains etc can not catch fire. But in the unlikely event of an internal chimney fire; the flue will be so hot that curtains, sheets etc can catch fire when too close to the flue.
We recommend solid boxing in because it means that nothing can accidentally fall into the void. You also need to consider the fact that there is ventilation where the twin wall passes through the floor.
Floor Passage - Wooden Floor
The passage through the floor can be done with:
- a Ventilated Firestop plate (aka spacer) against the ceiling (in practice customers often take a round trim plate); and
- a Vented Floor support on the floor.
1. Put a length through the floor and slide down the Vented Floor support plate (aka Vented ceiling support).
2. Screw this Floor support plate to the floor. Next, screw the support clamp directly to the jacket pipe of the length.
3. Glue the Ventilated Fire Stop plate (or round trim plate) onto the ceiling .

Safety distances
The minimum distance between the insulated chimney's outer wall and the combustible materials is 60mm (G60).
The minimum distance between the single wall stove pipes and the wooden floor is 3 times the diameter (of the pipe) and never less than 375mm. For 5" pipes (125mm) this means always minimum 375mm. For 6" pipes (150mm) it is 450mm.
If the flue passes through a first floor, it must be boxed in.

Flue Passage through the roof
Where the flue goes through the roof a flashing keeps everything watertight. The roof penetration is usually the part that customers are most concerned about, however it is not a difficult job and it is easy to make a weatherproof seal around the flue and roof using one of our ranges of flashing.

Installing a Twin Wall Flue
When you install a twin wall flue through a flat roof, ceiling, or wall, there are a series of steps that need to be followed. Let’s take a look at the step-by-step instructions for installing a twin wall flue through a ceiling or another part of your home.
Plan the Installation
The first part of the installation process is to plan it properly. Do you want to bring your wood burner flue through the wall? Do you want to bring a flue through the roof? Do you want to bring it through one ceiling and then the roof? Where will you install it so that it’s far enough from combustible materials? All of these and more require consideration.
Choose the Right Twin-Wall Flue Kit
Based on the planning stage, you can then choose a twin-wall flue kit that suits your needs. Here at flue-pipes.com we have a wide range of different twin-wall flue kits to suit your specific application. Here are a few examples:
-
Exterior straight - A straight flue simply attached to the exterior of a building.
-
Exterior with overhanging roof - a flue attached to the exterior, but accommodating the extra space required by a roof with an overhang.
-
Interior straight (1 or 2 stories) - A straight flue traveling through the interior of the house to vent through the roof.
-
Interior with offset (1 or 2 stories) - ideal for homes and other buildings requiring an indoor flue with a slight offset for one reason or another.
Measure and Mark
Once you know where you are installing your flue, you’re ready to mark the locations of any thimbles, brackets, cutouts, and other attachments.
Install the Wall Thimble
-
Cut a hole in the wall using a hole saw to accommodate the thimble.
-
Insert the thimble into the hole, ensuring a tight fit.
-
Secure the thimble in place using wall fixings.
Install Support Brackets
Install the required support brackets along the entire length of the flue, ensuring that they’re securely affixed to the wall and will provide sufficient support.
Assemble the Twin-Wall Flue Sections
Follow the installation instructions provided by the manufacturer to assemble the various sections of the flue.
Connect the Flue to the Stove or Fireplace
Connect the lower end of the flue to the stove or fireplace using an appropriate adapter.
Install the Flue Sections
Lift the assembled sections of the flue into place, fastening them securely (and at regular intervals) with the provided wall bands.
Check for Level
Use a spirit level to ensure that the flue is vertically level. Flues that aren’t properly installed and level may not transport gases and other combustion byproducts efficiently.
Install the Chimney Cap or Cowl
At the top of the flue, install either a cowl or a chimney cap. Doing so will prevent dust, debris, and other impurities from falling into the flue.
Inspect and Test
After the above steps, inspect the entire installation to ensure that all the joints are appropriately sealed. There shouldn’t be any signs of damage, improper connections, or inadequate sealing.
Conclusion
Installing a twin wall flue is easier than installing some other types of flue. The process isn't particularly difficult or strenuous. However, if you feel uncomfortable with this kind of task, it might be best to have a professional installation done. If you're interested in learning more about this kind of product and the required installation, feel free to contact us.


